-40%
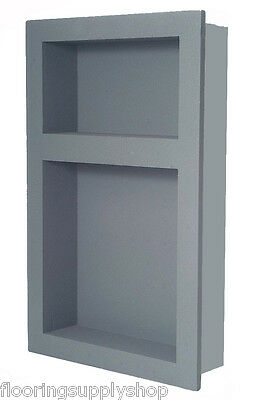
Preformed Ready to Tile Mega Combo Niche Recess 14 x 21 Soap Shampoo Shower
$ 36.93
- Description
- Size Guide
Description
Preformed Ready to Tile Rectangle Niche Recess Shelf 14 x 21Soap Dish Shampoo Holder for Shower and more
(3rd party buyers, your order will be canceled and you be reported to eBay)
Technical
2 Lbs high-density polystyrene compress Styrofoam
Approximately pre-finished dimensions:
Overall Size = 16" x 24" x 4"
Front net 12.5" x 6.5" and 12.5" x 12.5" , net depth = 3 1/2"
-----
Features
High Quality Materials:
Composed of 2 Lbs high-density polystyrene compress Styrofoam
with a liquid-applied waterproof coating they provide a waterproof substrate preparation for showers, bathrooms, and any water intensive environment.
Marble shelves available for this model in White or Beige
( 9.95)
-----
-
Anywhere you want to store, display... bath, kitchen, hall or exterior wall.
- PreFormed™ Niches are amazingly versatile.
- Easy to install and ready to tile in minutes, not hours.
- This unique design allows you to tile with the same tile as the surrounding walls.
- PreFormed Niches are a one-piece construction, and waterproof.
- Guaranteed to never rot, degrade, or leak.
- Their insulative factor does not promote condensation in the wall cavity.
- Materials: Saw or utility knife for cutting substrate layer out of niche location. Polyurethane sealant and fiberglass mesh.
- Waterproof.
- Installation Instructions -
Installation One Substrate Layer
Installation to existing 2 x 4 walls with wall board
• Determine desired height of niche and draw level line on substrate layer.
• Place niche with the bottom flange of the box centered on the level line.
• Trace exterior flanges.
• Cut along line and remove substrate layer. If accessible, install 2 X 4 horizontal cross bracing to support niche.
• Use polyurethane adhesive/sealant to adhere niche to studs.
• Seal joints between niche and backer board using polyurethane adhesive/sealant. Alternatively apply fiberglass mesh and a liquid waterproof membrane.
Installation: New Construction
Installing into 2” x 4” stud wall
• Determine desired height of niche and mark 2 x 4 accordingly.
• Install horizontal cross bracing to support niche.
• Use polyurethane adhesive/sealant to adhere niche to studs.
• Next, install 1/2" backer board on all walls and flush to niche 1/2" flanges.
• Seal joints between niche and backer board using polyurethane adhesive/sealant. Alternatively apply fiberglass mesh and a liquid waterproof membrane.
-----
Shipping & Returns
USA SELLER - In stock - Ship Same Day
30 Days money back guarantee
-----
Contact Us
For help of any sort, contact us by selecting 'contact seller' option
Our physical store is open to the public
Mon – Fri 7:00 am – 5:00 pm
Sunday – 8:00 am – 12:00 pm
Visit our store for more products
http://stores.ebay.com/FlooringSupplyShop


